Items: Difference between revisions
More actions
imported>76561198045853337 mNo edit summary |
→Buildings: Add SR Plasma Turret and Jammer Tower, remove duplicate Logistics Distributor Tag: 2017 source edit |
||
| (20 intermediate revisions by 11 users not shown) | |||
| Line 8: | Line 8: | ||
}} |
}} |
||
There are a large number of items in {{abbr|Dyson Sphere Program|DSP}}, that fall into two primary categories: Components, and Buildings. |
There are a large number of items in {{abbr|Dyson Sphere Program|DSP}}, that fall into two primary categories: [[Components]], and [[Buildings]]. |
||
==Components== |
==Components== |
||
This category contains items that are primarily used in other recipes, but also contains some outliers such as Logistics Vessels, and the various fuel types |
This category contains items that are primarily used in other recipes, but also contains some outliers such as Logistics Vessels, and the various fuel types |
||
{| style="text-align: center" |
|||
| ⚫ | |||
|- |
|- |
||
|{{ItemIcon|Iron Ore|size=45x45px}} |
|{{ItemIcon|Iron Ore|size=45x45px}} |
||
|{{ItemIcon|Copper Ore|size=45x45px}} |
|{{ItemIcon|Copper Ore|size=45x45px}} |
||
|{{ItemIcon|Stone |
|{{ItemIcon|Stone|size=45x45px}} |
||
|{{ItemIcon|Coal |
|{{ItemIcon|Coal|size=45x45px}} |
||
|{{ItemIcon|Silicon Ore|size=45x45px}} |
|{{ItemIcon|Silicon Ore|size=45x45px}} |
||
|{{ItemIcon|Titanium Ore|size=45x45px}} |
|{{ItemIcon|Titanium Ore|size=45x45px}} |
||
| Line 25: | Line 25: | ||
|{{ItemIcon|Deuterium|size=45x45px}} |
|{{ItemIcon|Deuterium|size=45x45px}} |
||
|{{ItemIcon|Antimatter|size=45x45px}} |
|{{ItemIcon|Antimatter|size=45x45px}} |
||
| ⚫ | |||
| ⚫ | |||
|{{ItemIcon|Kimberlite Ore|size=45x45px}} |
|{{ItemIcon|Kimberlite Ore|size=45x45px}} |
||
|- |
|- |
||
|{{ItemIcon|Iron Ingot|size=45x45px}} |
|{{ItemIcon|Iron Ingot|size=45x45px}} |
||
|{{ItemIcon|Copper Ingot|size=45x45px}} |
|{{ItemIcon|Copper Ingot|size=45x45px}} |
||
|{{ItemIcon|Stone|size=45x45px}} |
|{{ItemIcon|Stone Brick|size=45x45px}} |
||
|{{ItemIcon|Energetic Graphite|size=45x45px}} |
|{{ItemIcon|Energetic Graphite|size=45x45px}} |
||
|{{ItemIcon|High-Purity Silicon|size=45x45px}} |
|{{ItemIcon|High-Purity Silicon|size=45x45px}} |
||
| Line 38: | Line 40: | ||
|{{ItemIcon|Deuteron Fuel Rod|size=45x45px}} |
|{{ItemIcon|Deuteron Fuel Rod|size=45x45px}} |
||
|{{ItemIcon|Antimatter Fuel Rod|size=45x45px}} |
|{{ItemIcon|Antimatter Fuel Rod|size=45x45px}} |
||
| ⚫ | |||
| ⚫ | |||
|{{ItemIcon|Fractal Silicon|size=45x45px}} |
|{{ItemIcon|Fractal Silicon|size=45x45px}} |
||
|- |
|- |
||
| Line 46: | Line 50: | ||
|{{ItemIcon|Crystal Silicon|size=45x45px}} |
|{{ItemIcon|Crystal Silicon|size=45x45px}} |
||
|{{ItemIcon|Titanium Alloy|size=45x45px}} |
|{{ItemIcon|Titanium Alloy|size=45x45px}} |
||
|{{ItemIcon| |
|{{ItemIcon|Combustible Unit|size=45x45px}} |
||
|{{ItemIcon|Plastic|size=45x45px}} |
|{{ItemIcon|Plastic|size=45x45px}} |
||
|{{ItemIcon|Organic Crystal|size=45x45px}} |
|{{ItemIcon|Organic Crystal|size=45x45px}} |
||
|{{ItemIcon|Graphene|size=45x45px}} |
|{{ItemIcon|Graphene|size=45x45px}} |
||
|{{ItemIcon| |
|{{ItemIcon|Annihilation Constraint Sphere|size=45x45px}} |
||
|{{ItemIcon| |
|{{ItemIcon|Magnum Ammo Box|size=45x45px}} |
||
| ⚫ | |||
| ⚫ | |||
|- |
|- |
||
|{{ItemIcon|Steel|size=45x45px}} |
|{{ItemIcon|Steel|size=45x45px}} |
||
| Line 58: | Line 64: | ||
|{{ItemIcon|Electric Motor|size=45x45px}} |
|{{ItemIcon|Electric Motor|size=45x45px}} |
||
|{{ItemIcon|Microcrystalline Component|size=45x45px}} |
|{{ItemIcon|Microcrystalline Component|size=45x45px}} |
||
|{{ItemIcon| |
|{{ItemIcon|Proliferator Mk.I|size=45x45px}} |
||
|{{ItemIcon| |
|{{ItemIcon|Explosive Unit|size=45x45px}} |
||
|{{ItemIcon|Strange Matter|size=45x45px}} |
|{{ItemIcon|Strange Matter|size=45x45px}} |
||
|{{ItemIcon|Titanium Crystal|size=45x45px}} |
|{{ItemIcon|Titanium Crystal|size=45x45px}} |
||
|{{ItemIcon|Carbon Nanotube|size=45x45px}} |
|{{ItemIcon|Carbon Nanotube|size=45x45px}} |
||
|{{ItemIcon| |
|{{ItemIcon|Particle Broadband|size=45x45px}} |
||
| ⚫ | |||
| ⚫ | |||
|{{ItemIcon|Spiniform Stalagmite Crystal|size=45x45px}} |
|{{ItemIcon|Spiniform Stalagmite Crystal|size=45x45px}} |
||
|- |
|- |
||
| Line 71: | Line 79: | ||
|{{ItemIcon|Electromagnetic Turbine|size=45x45px}} |
|{{ItemIcon|Electromagnetic Turbine|size=45x45px}} |
||
|{{ItemIcon|Processor|size=45x45px}} |
|{{ItemIcon|Processor|size=45x45px}} |
||
|{{ItemIcon| |
|{{ItemIcon|Proliferator Mk.II|size=45x45px}} |
||
|{{ItemIcon| |
|{{ItemIcon|Crystal Explosive Unit|size=45x45px}} |
||
|{{ItemIcon| |
|{{ItemIcon|Casimir Crystal|size=45x45px}} |
||
|{{ItemIcon|Titanium Glass|size=45x45px}} |
|{{ItemIcon|Titanium Glass|size=45x45px}} |
||
|{{ItemIcon| |
|{{ItemIcon|Plane Filter|size=45x45px}} |
||
|{{ItemIcon| |
|{{ItemIcon|Quantum Chip|size=45x45px}} |
||
| ⚫ | |||
| ⚫ | |||
|{{ItemIcon|Unipolar Magnet|size=45x45px}} |
|{{ItemIcon|Unipolar Magnet|size=45x45px}} |
||
|- |
|- |
||
|{{ItemIcon| |
|{{ItemIcon|Engine|size=45x45px}} |
||
|{{ItemIcon| |
|{{ItemIcon|Thruster|size=45x45px}} |
||
|{{ItemIcon| |
|{{ItemIcon|Reinforced Thruster|size=45x45px}} |
||
|{{ItemIcon|Super-Magnetic Ring|size=45x45px}} |
|{{ItemIcon|Super-Magnetic Ring|size=45x45px}} |
||
|{{ItemIcon| |
|{{ItemIcon|Particle Container|size=45x45px}} |
||
|{{ItemIcon| |
|{{ItemIcon|Proliferator Mk.III|size=45x45px}} |
||
|{{ItemIcon| |
|{{ItemIcon|Prototype|size=45x45px}} |
||
|{{ItemIcon| |
|{{ItemIcon|Precision Drone|size=45x45px}} |
||
|{{ItemIcon| |
|{{ItemIcon|Attack Drone|size=45x45px}} |
||
|{{ItemIcon| |
|{{ItemIcon|Corvette|size=45x45px}} |
||
| ⚫ | |||
|{{ItemIcon|Plasma Capsule|size=45x45px}} |
|||
|{{ItemIcon|High-Explosive Shell Set|size=45x45px}} |
|||
|{{ItemIcon|Fire Ice|size=45x45px}} |
|||
|- |
|||
|{{ItemIcon|Logistics Bot|size=45x45px}} |
|||
|{{ItemIcon|Logistics Drone|size=45x45px}} |
|||
|{{ItemIcon|Logistics Vessel|size=45x45px}} |
|{{ItemIcon|Logistics Vessel|size=45x45px}} |
||
|{{ItemIcon|Space Warper|size=45x45px}} |
|||
|{{ItemIcon|Graviton Lens|size=45x45px}} |
|||
|{{ItemIcon|Foundation|size=45x45px}} |
|||
| ⚫ | |||
|{{ItemIcon|Solar Sail|size=45x45px}} |
|||
|{{ItemIcon|Frame Material|size=45x45px}} |
|||
|{{ItemIcon|Dyson Sphere Component|size=45x45px}} |
|||
|{{ItemIcon|Small Carrier Rocket|size=45x45px}} |
|||
|{{ItemIcon|Antimatter Capsule|size=45x45px}} |
|||
|{{ItemIcon|Crystal Shell Set|size=45x45px}} |
|||
|{{ItemIcon|Log|size=45x45px}} |
|{{ItemIcon|Log|size=45x45px}} |
||
|- |
|- |
||
| Line 98: | Line 125: | ||
|{{ItemIcon|Gravity Matrix|size=45x45px}} |
|{{ItemIcon|Gravity Matrix|size=45x45px}} |
||
|{{ItemIcon|Universe Matrix|size=45x45px}} |
|{{ItemIcon|Universe Matrix|size=45x45px}} |
||
|{{ItemIcon| |
|{{ItemIcon|Dark Fog Matrix|size=45x45px}} |
||
|{{ItemIcon| |
|{{ItemIcon|Energy Shard|size=45x45px}} |
||
|{{ItemIcon| |
|{{ItemIcon|Silicon-based Neuron|size=45x45px}} |
||
|{{ItemIcon| |
|{{ItemIcon|Negentropy Singularity|size=45x45px}} |
||
|{{ItemIcon| |
|{{ItemIcon|Matter Recombinator|size=45x45px}} |
||
|{{ItemIcon|Jamming Capsule|size=45x45px}} |
|||
|{{ItemIcon|Suppressing Capsule|size=45x45px}} |
|||
|{{ItemIcon|Plant Fuel|size=45x45px}} |
|{{ItemIcon|Plant Fuel|size=45x45px}} |
||
|} |
|} |
||
| Line 109: | Line 138: | ||
Buildings are all objects that can be directly placed on land in the game world, including for Logistics, Manufacturing, Resource Extraction and Energy Creation. |
Buildings are all objects that can be directly placed on land in the game world, including for Logistics, Manufacturing, Resource Extraction and Energy Creation. |
||
{| style="text-align: center" |
|||
| ⚫ | |||
|- |
|- |
||
|{{ItemIcon|Tesla Tower|size=45x45px}} |
|{{ItemIcon|Tesla Tower|size=45x45px}} |
||
| Line 115: | Line 144: | ||
|{{ItemIcon|Satellite Substation|size=45x45px}} |
|{{ItemIcon|Satellite Substation|size=45x45px}} |
||
|{{ItemIcon|Wind Turbine|size=45x45px}} |
|{{ItemIcon|Wind Turbine|size=45x45px}} |
||
|{{ItemIcon|Thermal Power |
|{{ItemIcon|Thermal Power Plant|size=45x45px}} |
||
|{{ItemIcon|Solar Panel|size=45x45px}} |
|{{ItemIcon|Solar Panel|size=45x45px}} |
||
|{{ItemIcon| |
|{{ItemIcon|Geothermal Power Station|size=45x45px}} |
||
|{{ItemIcon|Mini Fusion Power Plant|size=45x45px}} |
|||
|{{ItemIcon|Energy Exchanger|size=45x45px}} |
|||
|{{ItemIcon|Accumulator|size=45x45px}} |
|{{ItemIcon|Accumulator|size=45x45px}} |
||
|{{ItemIcon|Full Accumulator|size=45x45px}} |
|{{ItemIcon|Full Accumulator|size=45x45px}} |
||
| ⚫ | |||
|{{ItemIcon|Ray Receiver|size=45x45px}} |
|{{ItemIcon|Ray Receiver|size=45x45px}} |
||
|{{ItemIcon|Artificial Star|size=45x45px}} |
|{{ItemIcon|Artificial Star|size=45x45px}} |
||
| ⚫ | |||
|- |
|- |
||
|{{ItemIcon|Conveyor Belt Mk.I|size=45x45px}} |
|{{ItemIcon|Conveyor Belt Mk.I|size=45x45px}} |
||
| Line 128: | Line 159: | ||
|{{ItemIcon|Conveyor Belt Mk.III|size=45x45px}} |
|{{ItemIcon|Conveyor Belt Mk.III|size=45x45px}} |
||
|{{ItemIcon|Splitter|size=45x45px}} |
|{{ItemIcon|Splitter|size=45x45px}} |
||
|{{ItemIcon|Automatic Piler|size=45x45px}} |
|||
|{{ItemIcon|Traffic Monitor|size=45x45px}} |
|||
|{{ItemIcon|Spray Coater|size=45x45px}} |
|||
|{{ItemIcon|Storage Mk.I|size=45x45px}} |
|{{ItemIcon|Storage Mk.I|size=45x45px}} |
||
|{{ItemIcon|Storage Mk.II|size=45x45px}} |
|{{ItemIcon|Storage Mk.II|size=45x45px}} |
||
|{{ItemIcon|Storage Tank|size=45x45px}} |
|{{ItemIcon|Storage Tank|size=45x45px}} |
||
|{{ItemIcon|Logistics Distributor|size=45x45px}} |
|||
|{{ItemIcon|Planetary Logistics Station|size=45x45px}} |
|{{ItemIcon|Planetary Logistics Station|size=45x45px}} |
||
|{{ItemIcon|Interstellar Logistics Station|size=45x45px}} |
|{{ItemIcon|Interstellar Logistics Station|size=45x45px}} |
||
|{{ItemIcon|Orbital Collector|size=45x45px}} |
|{{ItemIcon|Orbital Collector|size=45x45px}} |
||
| ⚫ | |||
| ⚫ | |||
|- |
|- |
||
|{{ItemIcon|Sorter Mk.I|size=45x45px}} |
|{{ItemIcon|Sorter Mk.I|size=45x45px}} |
||
|{{ItemIcon|Sorter Mk.II|size=45x45px}} |
|{{ItemIcon|Sorter Mk.II|size=45x45px}} |
||
|{{ItemIcon|Sorter Mk.III|size=45x45px}} |
|{{ItemIcon|Sorter Mk.III|size=45x45px}} |
||
|{{ItemIcon|Pile Sorter|size=45x45px}} |
|||
|{{ItemIcon|Mining Machine|size=45x45px}} |
|{{ItemIcon|Mining Machine|size=45x45px}} |
||
|{{ItemIcon|Advanced Mining Machine|size=45x45px}} |
|||
|{{ItemIcon|Water Pump|size=45x45px}} |
|{{ItemIcon|Water Pump|size=45x45px}} |
||
|{{ItemIcon|Oil Extractor|size=45x45px}} |
|{{ItemIcon|Oil Extractor|size=45x45px}} |
||
|{{ItemIcon|Oil Refinery|size=45x45px}} |
|{{ItemIcon|Oil Refinery|size=45x45px}} |
||
|{{ItemIcon|Fractionator|size=45x45px}} |
|||
|{{ItemIcon|Chemical Plant|size=45x45px}} |
|||
|{{ItemIcon|Quantum Chemical Plant|size=45x45px}} |
|||
|{{ItemIcon|Miniature Particle Collider|size=45x45px}} |
|{{ItemIcon|Miniature Particle Collider|size=45x45px}} |
||
| |
|||
| ⚫ | |||
| ⚫ | |||
| ⚫ | |||
| ⚫ | |||
|- |
|- |
||
|{{ItemIcon|Arc Smelter|size=45x45px}} |
|||
|{{ItemIcon|Plane Smelter|size=45x45px}} |
|||
|{{ItemIcon|Negentropy Smelter|size=45x45px}} |
|||
|{{ItemIcon|Assembling Machine Mk.I|size=45x45px}} |
|{{ItemIcon|Assembling Machine Mk.I|size=45x45px}} |
||
|{{ItemIcon|Assembling Machine Mk.II|size=45x45px}} |
|{{ItemIcon|Assembling Machine Mk.II|size=45x45px}} |
||
|{{ItemIcon|Assembling Machine Mk.III|size=45x45px}} |
|{{ItemIcon|Assembling Machine Mk.III|size=45x45px}} |
||
|{{ItemIcon| |
|{{ItemIcon|Re-composing Assembler|size=45x45px}} |
||
|{{ItemIcon| |
|{{ItemIcon|Matrix Lab|size=45x45px}} |
||
|{{ItemIcon| |
|{{ItemIcon|Self-evolution Lab|size=45x45px}} |
||
|{{ItemIcon| |
|{{ItemIcon|EM-Rail Ejector|size=45x45px}} |
||
|{{ItemIcon| |
|{{ItemIcon|Vertical Launching Silo|size=45x45px}} |
||
| |
|||
| ⚫ | |||
| |
|||
| ⚫ | |||
| |
|||
| ⚫ | |||
|- |
|||
| ⚫ | |||
|{{ItemIcon|Gauss Turret|size=45x45px}} |
|||
|{{ItemIcon|Missile Turret|size=45x45px}} |
|||
|{{ItemIcon|Implosion Cannon|size=45x45px}} |
|||
|{{ItemIcon|Laser Turret|size=45x45px}} |
|||
|{{ItemIcon|Plasma Turret|size=45x45px}} |
|||
|{{ItemIcon|SR Plasma Turret|size=45x45px}} |
|||
|{{ItemIcon|Battlefield Analysis Base|size=45x45px}} |
|||
|{{ItemIcon|Jammer Tower|size=45x45px}} |
|||
|{{ItemIcon|Signal Tower|size=45x45px}} |
|||
|{{ItemIcon|Planetary Shield Generator|size=45x45px}} |
|||
| |
|||
| |
|||
| |
|||
| |
|||
|} |
|} |
||
==Components Quick Reference Sheet== |
==Components Quick Reference Sheet== |
||
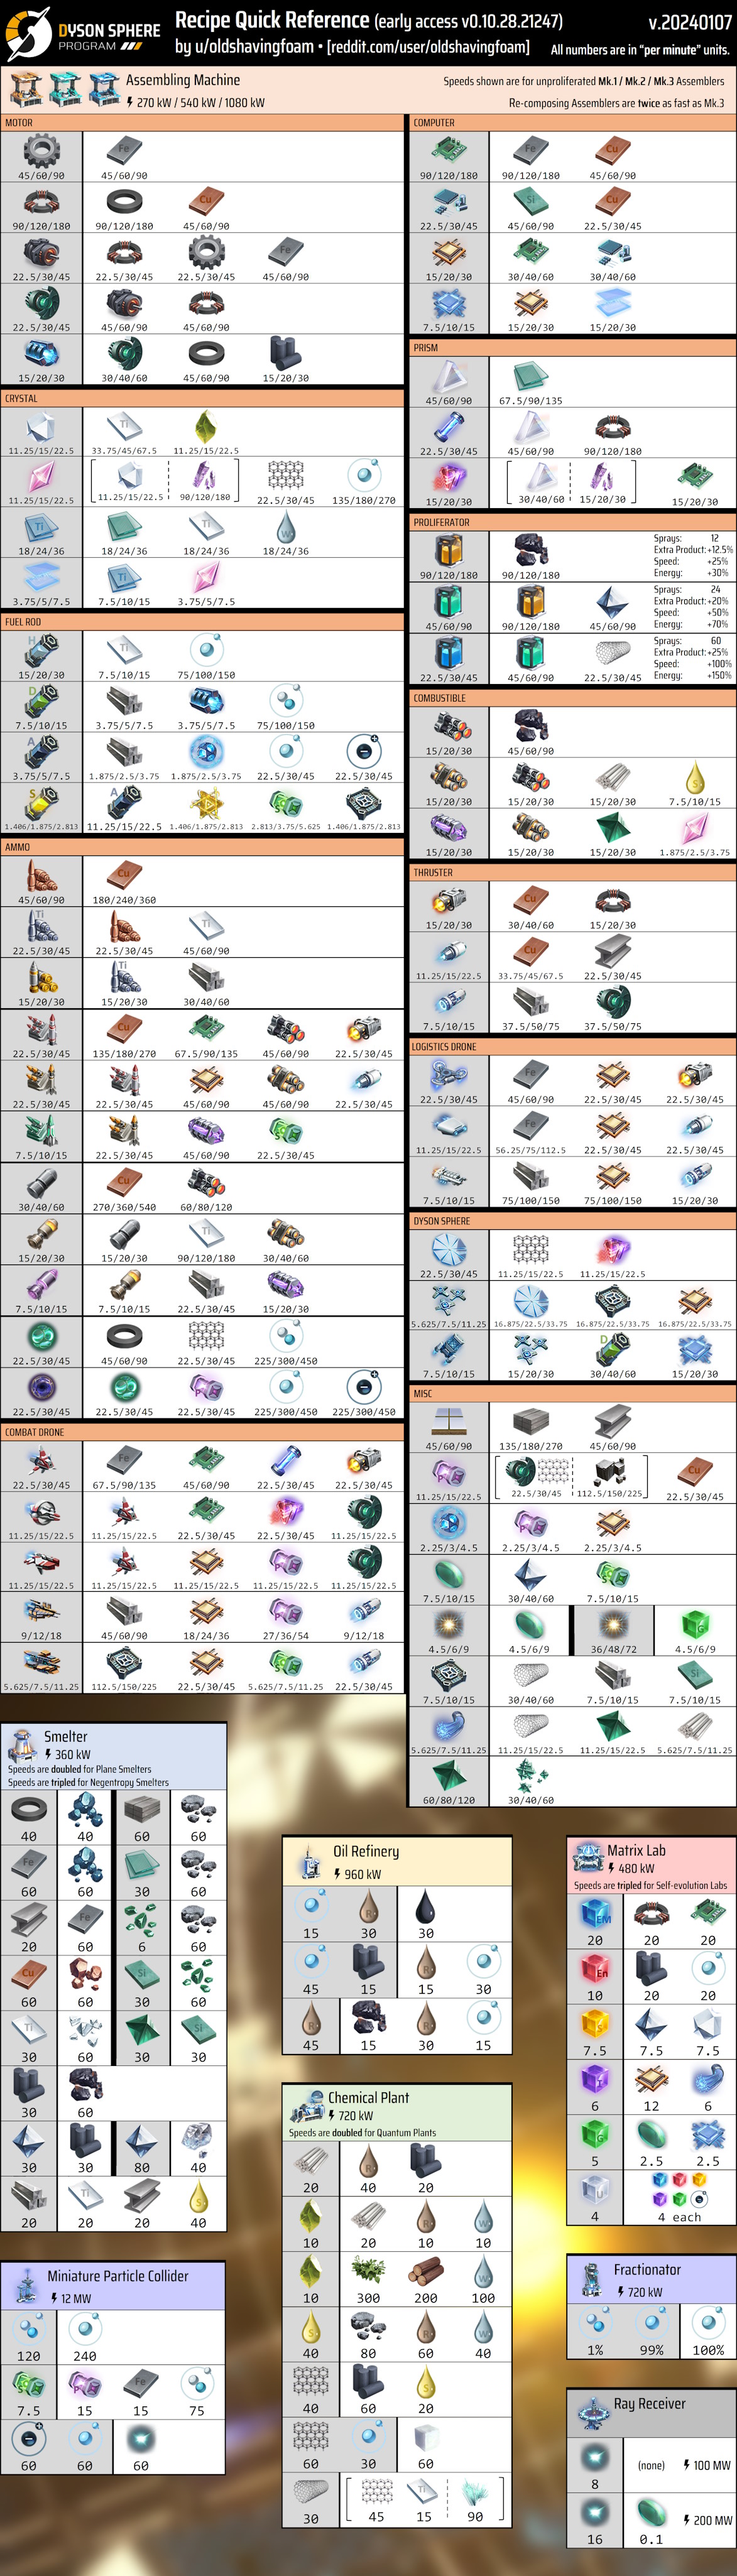
Below is a quick reference sheet that displays all of the component recipes according to their "per minute" production values. Recipes are grouped by production building. |
Below is a quick reference sheet that displays all of the component recipes according to their "per minute" production values. Recipes are grouped by production building. Created by Reddit user u/oldshavingfoam. Click the image to enlarge it. |
||
[[File:Recipe Quick Reference.jpg|100px| |
[[File:Recipe Quick Reference.jpg|100px|Components Quick Reference Sheet]] |
||
==Building Quick Reference Sheet== |
|||
Below is a quick reference sheet that displays all of the building recipes, along with their power consumption/production values. Created by Reddit user u/oldshavingfoam. Click the image to enlarge it. |
|||
[[File:Building Quick Reference.jpg|250px|Building Quick Reference Sheet]] |
|||
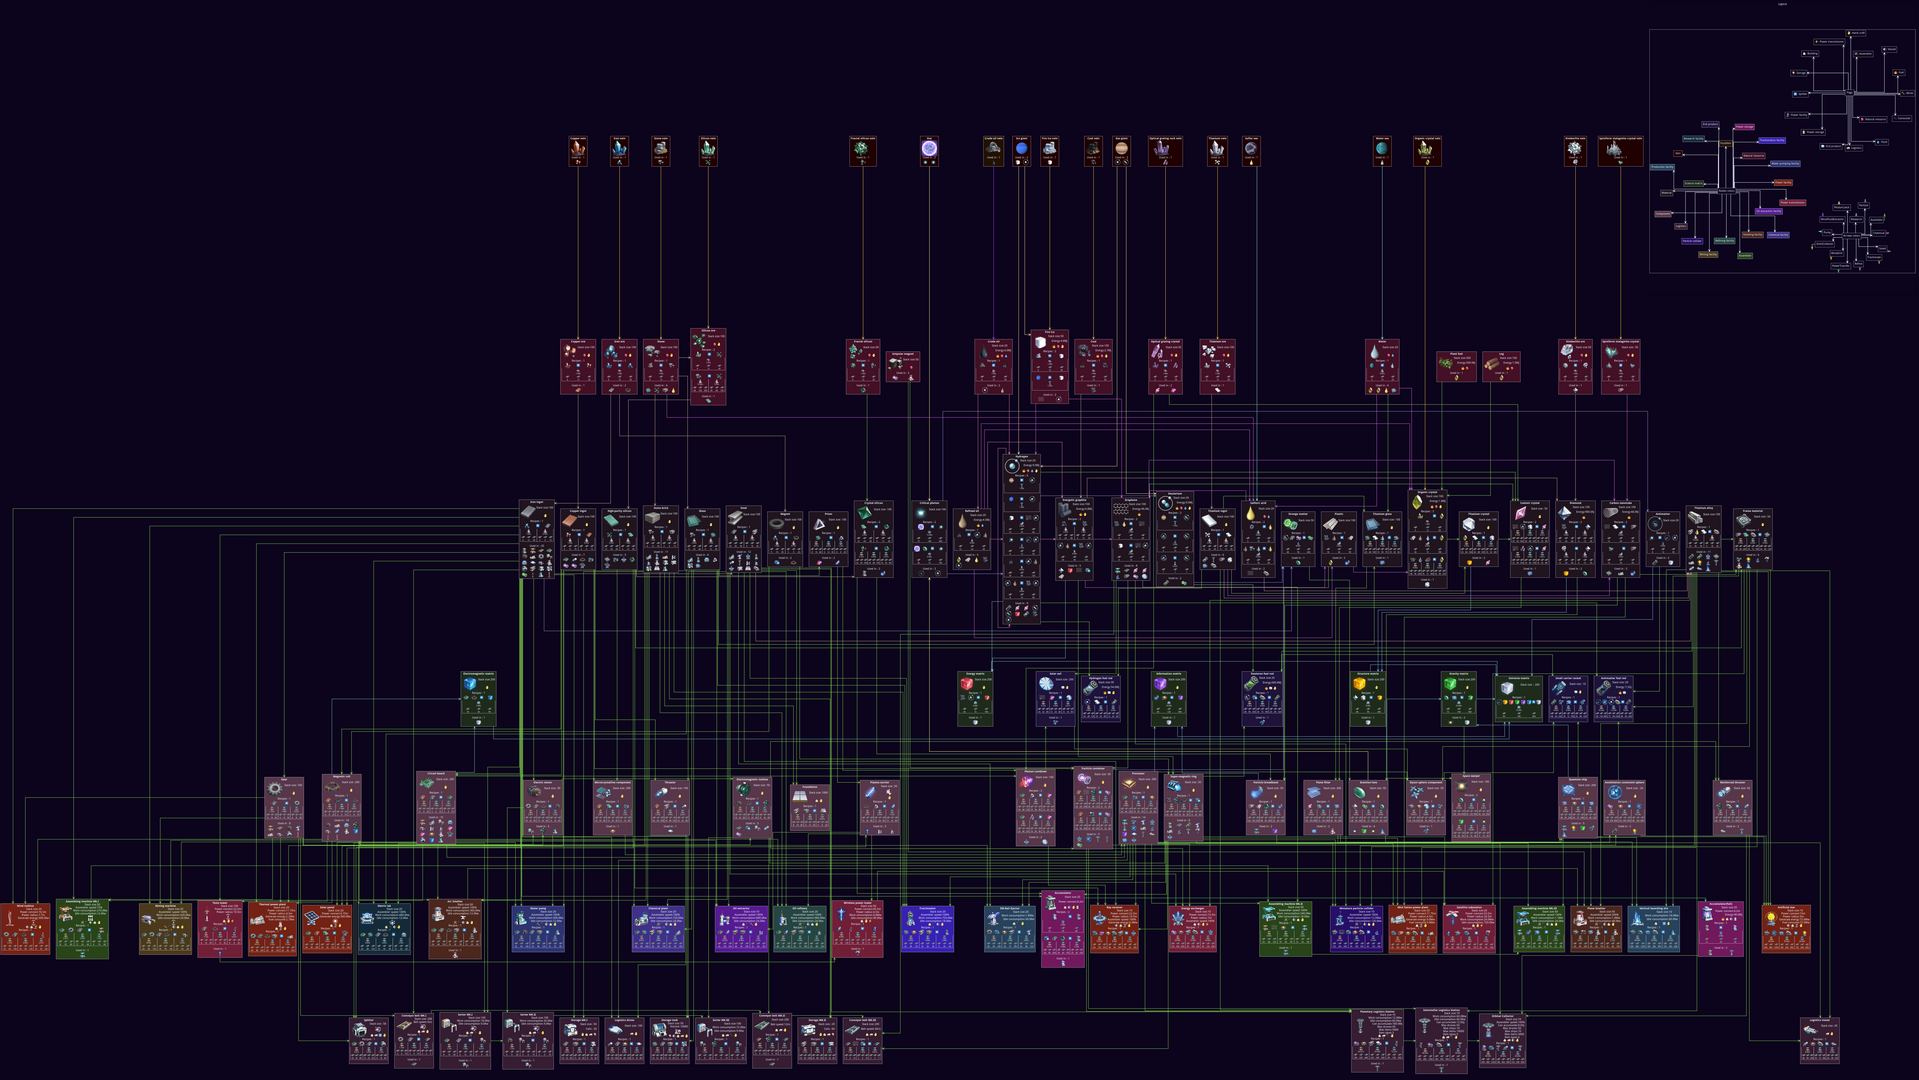
==Production Graph== |
|||
Click the image to enlarge it. |
|||
| ⚫ | |||
== |
==External links== |
||
* [https://www.reddit.com/r/Dyson_Sphere_Program/comments/lbt0d2/a_lot_of_people_loved_my_early_game_recipe_sheet/ Recipe Quick Reference by u/oldshavingfoam] |
|||
| ⚫ | |||
* [https://www.reddit.com/r/Dyson_Sphere_Program/comments/o6ocpc/as_requested_building_quick_reference_guide/ Building Quick Reference by u/oldshavingfoam] |
|||
* [https://sheridan.github.io/dsp/graph_items.png Production graph original resolution] |
|||
Full version is available [https://raw.githubusercontent.com/Sheridan/dsp_tools/main/graph/result/graph_items_dot.png here] |
|||
{{Item Navbox}} |
|||
| ⚫ | |||
{{DSP Navbox}} |
|||
| ⚫ | |||
Latest revision as of 02:19, 29 April 2024
There are a large number of items in DSP, that fall into two primary categories: Components, and Buildings.
Components
This category contains items that are primarily used in other recipes, but also contains some outliers such as Logistics Vessels, and the various fuel types
Buildings
Buildings are all objects that can be directly placed on land in the game world, including for Logistics, Manufacturing, Resource Extraction and Energy Creation.
Components Quick Reference Sheet
Below is a quick reference sheet that displays all of the component recipes according to their "per minute" production values. Recipes are grouped by production building. Created by Reddit user u/oldshavingfoam. Click the image to enlarge it.

Building Quick Reference Sheet
Below is a quick reference sheet that displays all of the building recipes, along with their power consumption/production values. Created by Reddit user u/oldshavingfoam. Click the image to enlarge it.

Production Graph
Click the image to enlarge it.

External links
- Recipe Quick Reference by u/oldshavingfoam
- Building Quick Reference by u/oldshavingfoam
- Production graph original resolution
- Annihilation Constraint Sphere
- Antimatter
- Carbon Nanotube
- Casimir Crystal
- Circuit Board
- Critical Photon
- Crystal Explosive Unit
- Crystal Silicon
- Combustible Unit
- Copper Ingot
- Diamond
- Dyson Sphere Component
- Electric Motor
- Electromagnetic Turbine
- Energetic Graphite
- Explosive Unit
- Frame Material
- Gear
- Glass
- Graphene
- Graviton Lens
- High-Purity Silicon
- Iron Ingot
- Magnet
- Magnetic Coil
- Microcrystalline Component
- Plane Filter
- Plasma Exciter
- Plastic
- Prism
- Processor
- Proliferator Mk.I
- Proliferator Mk.II
- Proliferator Mk.III
- Quantum Chip
- Reinforced Thruster
- Particle Broadband
- Particle Container
- Photon Combiner
- Refined Oil
- Steel
- Stone Brick
- Strange Matter
- Super-Magnetic Ring
- Titanium Alloy
- Titanium Crystal
- Titanium Glass
- Titanium Ingot
- Thruster