Mining Machine: Difference between revisions
More actions
imported>76561198121518784 No edit summary |
imported>76561198062903206 Production Progression Chart |
||
| Line 3: | Line 3: | ||
</div> |
</div> |
||
==Summary== |
==Summary== |
||
The more veins covered by the mining machine, the faster the mining speed |
The more veins covered by the mining machine, the faster the mining speed. The same vein can be covered by multiple mining rings, and the more mining rings covered, the faster the consumption. |
||
==Production Chain== |
==Production Chain== |
||
| Line 28: | Line 28: | ||
|} |
|} |
||
===Production Progression Chart=== |
|||
==Total Raw Materials== |
|||
:''for more information on reading and using these charts, see [[Production Progression Chart]]'' |
|||
* 10x Iron Ore |
|||
{| class="wikitable" style="text-align:center; background-color:#0b161c" |
|||
| ⚫ | |||
!Stage 1 |
|||
!Stage 2 |
|||
Gives Extra: none. |
|||
! Stage 3 |
|||
!Stage 4 |
|||
|- |
|||
|{{riq|Iron Ore|240}} |
|||
|{{riq|Smelter|4}} {{to}} {{riq|Iron Ingot|240}} |
|||
|{{ppc skip}} |
|||
| rowspan="6" |{{riq|Assembling Machine Mk.II|3}} {{to}} {{riq|Mining Machine|60}} |
|||
|- |
|||
|{{riq|Iron Ore|120}} |
|||
|{{riq|Smelter|2}} {{to}} {{riq|Iron Ingot|120}} |
|||
|{{riq|Assembling Machine Mk.II|2}} {{to}} {{riq|Gear|120}} |
|||
|- |
|||
|{{riq|Iron Ore|120}} |
|||
|{{riq|Smelter|3}} {{to}} {{riq|Magnet|120}} |
|||
| rowspan="2" |{{riq|Assembling Machine Mk.II|2}} {{to}} {{riq|Magnetic Coil|120}} |
|||
|- |
|||
| ⚫ | |||
|{{riq|Smelter|1}} {{to}} {{riq|Copper Ingot|60}} |
|||
|- |
|||
|{{riq|Iron Ore|120}} |
|||
|{{riq|Smelter|2}} {{to}} {{riq|Iron Ingot|120}} |
|||
| rowspan="2" |{{riq|Assembling Machine Mk.II|2}} {{to}} {{riq|Circuit Board|120}} |
|||
|- |
|||
|{{riq|Copper Ore|60}} |
|||
|{{riq|Smelter|1}} {{to}} {{riq|Copper Ingot|60}} |
|||
|- |
|||
! colspan="2" | Buildings Required |
|||
| colspan="2" align="left" |{{riq|Smelter|13}} {{riq|Assembling Machine Mk.II|9}} |
|||
|- |
|||
! colspan="2" |Raw Materials Required |
|||
(per minute) |
|||
| colspan="2" |{{riq|Iron Ore|600}} {{riq|Copper Ore|120}} |
|||
|- |
|||
! colspan="2" |Raw Materials Required |
|||
(per unit) |
|||
| colspan="2" |{{riq|Iron Ore|10}} {{riq|Copper Ore|2}} |
|||
|} |
|||
==Player Tips & Tricks== |
==Player Tips & Tricks== |
||
Here's a formula for determining how many veins you need to cover, to fill a belt: |
Here's a formula for determining how many veins you need to cover, to fill a belt: |
||
<pre> |
<pre> |
||
| Line 44: | Line 80: | ||
</pre> |
</pre> |
||
The [[ |
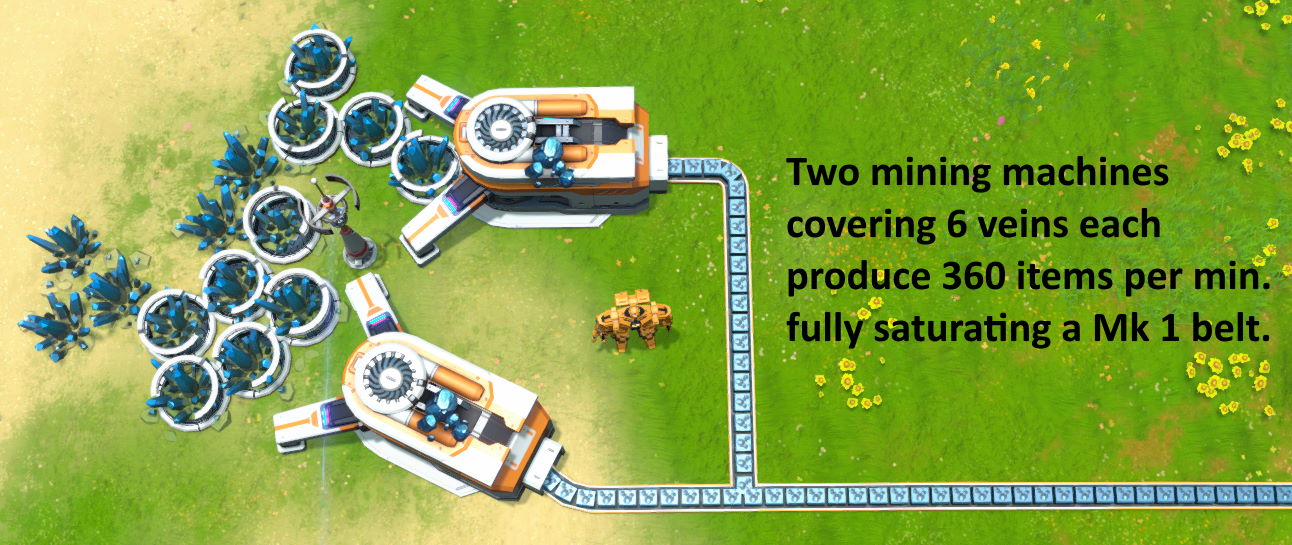
The [[Conveyor Belt Mk.I]] can carry 6 items per second or 360 items per minute. A [[Mining Machine]] that is covering exactly 6 veins will produce 180 items per second. Combining the belts from two mining machines will fully saturate a Conveyor Belt Mk.I with a full 360 items per minute. Note: Mining machines can cover the same resource veins, as shown in the picture below. |
||
[[File:Two Mining Machines Fully Saturate a Belt.jpg|500px|thumb|none|Two Mining Machines Fully Saturate a Belt]] |
[[File:Two Mining Machines Fully Saturate a Belt.jpg|500px|thumb|none|Two Mining Machines Fully Saturate a Belt]] |
||
| Line 50: | Line 86: | ||
{| class="wikitable" |
{| class="wikitable" |
||
|+ |
|+Veins needed to fill a belt |
||
|- |
|- |
||
! |
!Belt Teir!!Base!![[File:Tech_Veins_Utilization_1.png]]!![[File:Tech_Veins_Utilization_2.png]]!![[File:Tech_Veins_Utilization_3.png]]!![[File:Tech_Veins_Utilization_4.png]]!![[File:Tech_Veins_Utilization_5.png]] |
||
|- |
|- |
||
| |
|[[File:Icon_Conveyor_Belt_Mk.I.png|link=Conveyor_Belt_Mk.I]]||'''<big>12</big>'''||'''<big>11</big>'''||'''<big>10</big>'''||'''<big>9.3</big>'''||'''<big>8.6</big>'''||'''<big>8</big>''' |
||
|- |
|- |
||
| |
|[[File:Icon_Conveyor_Belt_Mk.II.png|link=Conveyor_Belt_Mk.II]]||'''<big>24</big>'''||'''<big>21.2</big>'''||'''<big>20</big>'''||'''<big>18.5</big>'''||'''<big>17.2</big>'''||'''<big>16</big>''' |
||
|- |
|- |
||
| |
|[[File:Icon_Conveyor_Belt_Mk.III.png|link=Conveyor_Belt_Mk.III]]||'''<big>60</big>'''||'''<big>54.6</big>'''||'''<big>50</big>'''||'''<big>46.2</big>'''||'''<big>42.9</big>'''||'''<big>40</big>''' |
||
|} |
|} |
||
Revision as of 05:44, 24 February 2021
| Gathering Target | Vein | |
| Gathering Speed | 30 * veins * Mining speed/min | |
| Work Consumption | 420 kW | |
| Idle Consumption | 24.0 kW | |
| Made In | Assembler | |
| Hand-Make | Replicator | |
| Stack Size | 50 |
Summary
The more veins covered by the mining machine, the faster the mining speed. The same vein can be covered by multiple mining rings, and the more mining rings covered, the faster the consumption.
Production Chain
| Recipe | Building | Replicator? | Technology |
|---|---|---|---|
| ✔ |

Production Progression Chart
- for more information on reading and using these charts, see Production Progression Chart
| Stage 1 | Stage 2 | Stage 3 | Stage 4 |
|---|---|---|---|
| |
| ||
| |
| ||
| |
| ||
| | |||
| |
| ||
| | |||
| Buildings Required | |||
| Raw Materials Required
(per minute) |
|||
| Raw Materials Required
(per unit) |
|||
Player Tips & Tricks
Here's a formula for determining how many veins you need to cover, to fill a belt:
V = (2 * Bs) / (1 + (0.1 * Vu))
V = Veins
Bs = Belt Speed (in items/second)
Vu = # of Veins Utilizations Upgrades completed
The Conveyor Belt Mk.I can carry 6 items per second or 360 items per minute. A Mining Machine that is covering exactly 6 veins will produce 180 items per second. Combining the belts from two mining machines will fully saturate a Conveyor Belt Mk.I with a full 360 items per minute. Note: Mining machines can cover the same resource veins, as shown in the picture below.

The mining machine harvests each vein covered by its harvest area at a rate of 30/s (without any technology researched). This rate is the same for all material veins. Each level of the Veins Utilization Upgrade increases the harvest rate by 10%, and reduces the consumption rate by 6%.
| Belt Teir | Base |  |
 |
 |
 |
 |
|---|---|---|---|---|---|---|
| 12 | 11 | 10 | 9.3 | 8.6 | 8 | |
| 24 | 21.2 | 20 | 18.5 | 17.2 | 16 | |
| 60 | 54.6 | 50 | 46.2 | 42.9 | 40 |